If you have formed an email address in the Control Panel, you can set it up in Outlook 2016.
Follow the procedure:
- E-Mail account administration:
- Launch Outlook and go to the “Files” tab.

- Click on “Add Account” under the “Info” section.

- Launch Outlook and go to the “Files” tab.
- Auto Account setup:
- Enter a name for your account (shown in the account list) and the sender name that recipients will see.
- Input the full email address and the password you defined in the Control Panel when setting up the email address.
- Click “Next” to automatically search for the correct account settings.
- If you see a success notification, your account has been set up properly.

- Manual configuration:
- To set up the E-Mail address yourself, go to “Manual setup or additional server types” and then click “Next”.

- To set up the E-Mail address yourself, go to “Manual setup or additional server types” and then click “Next”.
- Choosing the account type: POP3 or IMAP:
Now choose between a POP3 or IMAP account-- IMAP- Saves your emails on the server. Each time you read an email, a copy is downloaded from the server.
- POP3- Downloads and saves your emails to your Outlook. The messages are then deleted from the server, allowing offline access to your emails, such as when you are on a train.
If you are unsure, choose IMAP.

- Configuration:
- Enter a name for your account (this name will appear in the account list) and the sender name that recipients of your emails will see.
- Input your full email address.
- For the Incoming Server, use imap.mail.hostpoint.ch for IMAP or pop.mail.hostpoint.ch for POP3.
- For the Outgoing Mail Server, enter asmtp.mail.hostpoint.ch.
- Use your full email address as the username and enter the corresponding password.
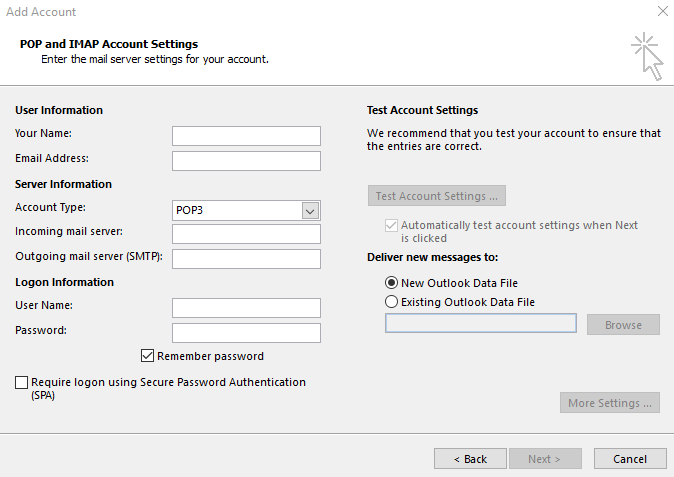
- Go to “More Settings,” select the “Outgoing Server” tab, and enable authentication with “Use same settings as my incoming mail server.”

- Check encryption settings under the “Advanced” tab, then click “OK” and “Next.”

- The account settings will be verified, and you will see a success notification if everything is set up correctly.

Your Outlook 2016 should now be configured to send and receive emails from your domain. If you require additional assistance, feel free to contact our support staff as early as possible.
For a comprehensive guide on : How to Connect to Webmail in Gmail